
To check for vacuum leaks using carb cleaner, spray the cleaner around the vacuum lines and listen for idle speed changes. If the engine revs, you’ve likely found a leak.
Identifying a vacuum leak in your vehicle is crucial for maintaining optimal engine performance and efficiency. Checking for such leaks with carburetor cleaner is an inexpensive, yet effective, method. Car owners and mechanics use this technique to pinpoint problematic areas that may cause rough idling, stalling, or difficulties with acceleration.
Vacuum leaks disrupt the air-fuel mixture, leading to a variety of engine issues. By following this simple diagnostic procedure, you ensure that your engine runs smoothly and continues to perform at its best. Remember to perform this test in a well-ventilated area, as carb cleaner fumes can be hazardous.

Understanding Vacuum Leaks
Maintaining your vehicle’s pristine performance involves a symphony of components working in unison. One pivotal aspect pertains to the vacuum system, which, if compromised, can lead to a host of engine troubles. Let’s navigate through the intricacies of vacuum leaks, what signs may suggest their presence, and their potential impact on engine performance.
Explanation Of Vacuum Leaks
A vacuum leak refers to an unintended breach in the engine’s intake manifold or the vacuum hoses, allowing air to infiltrate where it’s not supposed to. This anomaly disrupts the delicate air-fuel balance essential for efficient combustion. The engine relies on a vacuum to manage various functions, from controlling the air conditioning and heating systems to managing the engine’s idle speed and emissions.
Signs And Symptoms Of Vacuum Leaks
- Rough Idle: An erratic idle or engine stalling could be indicators of a vacuum leak.
- Increased Fuel Consumption: Unexplained fuel inefficiency often roots back to a leak, causing the engine to compensate for the lean mixture.
- Hissing Sounds: Evocative of air escaping, hissing sounds emerging from the engine bay may pinpoint a vacuum breach.
- Engine Error Codes: Modern vehicles may trigger check engine lights with corresponding error codes, suggesting vacuum irregularities.
- Performance Deficits: Diminished acceleration and power could result from a compromised vacuum.
Impact Of Vacuum Leaks On Engine Performance
The occurrence of a vacuum leak subtly commences a cascade of performance degradation. An adequate vacuum is crucial for maintaining optimal air-fuel ratios. Without it, fuel cannot vaporize as effectively, leading to suboptimal combustion, decreased efficiency, and higher emissions. Furthermore, the engine’s timing and fuel injection systems rely on vacuum signals to function correctly; thus, leaks can result in poor timing, misfires, and reduced power output.
Preparation For Using Carb Cleaner
Before diving into the task of checking for vacuum leaks with a carb cleaner, proper preparation is pivotal to ensure a flawless process and to maintain safety standards. Vacuum leaks can lead to engine performance issues, so detecting and fixing them is crucial. The following steps set the stage for a successful and secure search for vacuum leaks, focusing primarily on the usage of carburetor cleaner, which is an effective and common method among automotive enthusiasts and professionals alike.
Safety Precautions
First and foremost, it is vital to take safety precautions seriously. Recognize that when dealing with any flammable materials, such as carb cleaner, potential hazards are present. Always work in a well-ventilated area to avoid inhalation of fumes. Ensure the engine is turned off and cool to the touch to prevent burns and other injuries. Keep a fire extinguisher within reach in case of emergencies.
Protective Gear And Equipment
- Gloves – Wear nitrile or mechanic gloves to protect your skin from chemicals.
- Goggles – Safety goggles guard against accidental splashes into your eyes.
- Overalls or Work Clothes – Dress in clothes you don’t mind getting dirty or stained.
Additionally, have all necessary tools on hand to avoid searching for equipment mid-process, which can lead to safety lapses or accidental ingestion or contact with the cleaner.
Safety Measures For Working With Carb Cleaner
- Read the Product Label – Familiarize yourself with the directions of use and the manufacturer’s safety advice.
- Avoid Sparks and Open Flames – Carb cleaner is highly flammable, so keep it away from ignition sources.
- Proper Disposal – Once finished, dispose of any used cloths or empty containers as per local regulations to protect the environment and prevent fires.
Remember, neglecting proper safety measures can turn a simple maintenance task into a hazardous situation. By following these guidelines, you ensure that your search for vacuum leaks with carb cleaner is not only effective but also safe.
Locating Vacuum Leaks With Carb Cleaner
Vacuum leaks in an engine can cause a myriad of issues, from rough idling and decreased fuel efficiency to misfires and potential engine damage. To keep a vehicle’s engine running smoothly, mechanics often use carb cleaner as an effective method for detecting these elusive leaks. In this section, we will walk you through the steps to find and fix vacuum leaks using carb cleaner—a go-to technique that any DIY enthusiast or seasoned mechanic can employ.
Identifying Potential Leak Points
Before starting the hunt for vacuum leaks, it’s essential to understand where they are likely to occur. Vacuum leaks typically happen where air can sneak into the intake manifold or associated vacuum lines. Gaskets, hoses, and other sealing surfaces are often the culprits. Identifying these potential leak points is the first critical step toward diagnosis.
Common Areas For Vacuum Leaks In An Engine
- Intake Manifold Gaskets: Degradation or cracks can occur here, especially where the manifold mates to the cylinder head.
- Throttle Body: The junction between the throttle body and the manifold is also prone to leaks.
- Vacuum Hoses and Lines: Over time, these can become brittle, cracked, or disconnected.
- Brake Booster: Often overlooked, this component can also be a source of air leakage.
- EGR Valves and PCV Valves: Their connections and state can contribute to vacuum inconsistencies.
Visual Inspection Techniques
Performing a visual inspection is the next important step. Look for any obvious signs of wear, such as cracks or loose components in the areas listed above. A keen eye might spot signs of leakage where residue builds up, indicating where extra air could be entering the system.
Using Carb Cleaner For Detection
Carb cleaner is an efficient way to pinpoint the exact location of a vacuum leak. Its properties allow it to temporarily alter the engine’s idle when applied to a leaking area. Selecting a quality carb cleaner is crucial for accurate results.
Procedure For Applying Carb Cleaner
- Ensure the engine is running and at normal operating temperature.
- Wear safety goggles and gloves to protect against chemical exposure.
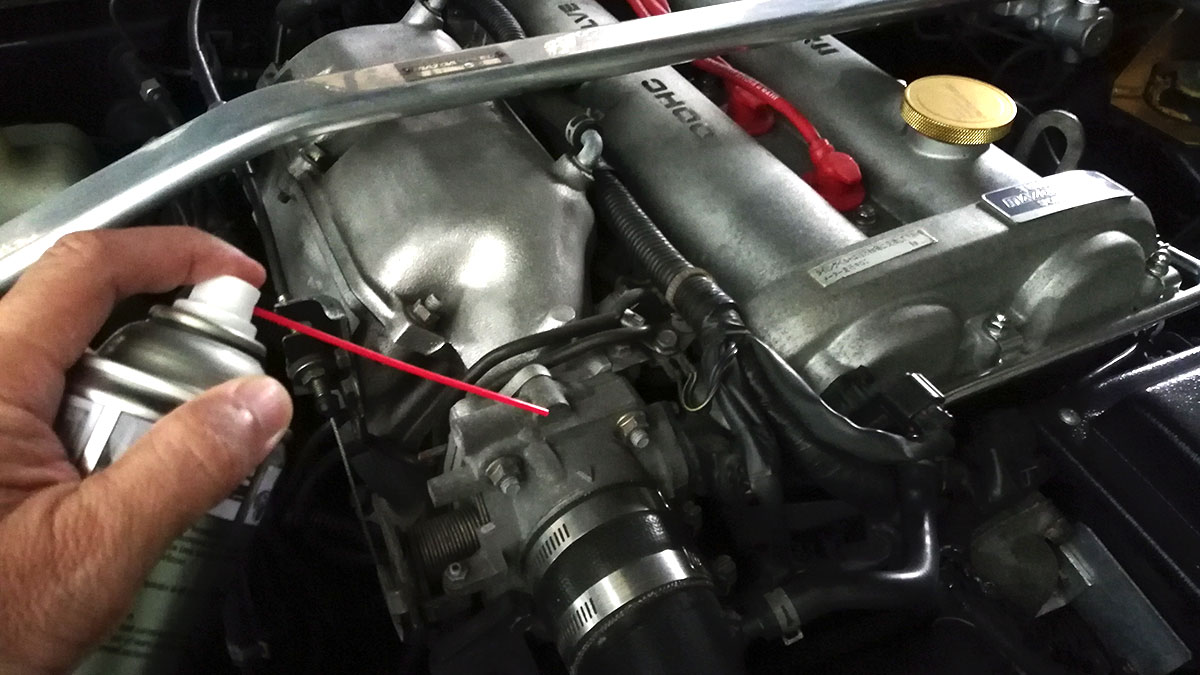
- Apply the carb cleaner sparingly to likely leak points while the engine is idling.
- Use a straw attachment for precision and to keep a safe distance from moving parts.
Observing Reactions To Locate Leaks
When carb cleaner is sprayed onto a spot with a potential vacuum leak, the engine’s idle will change. This is due to the carb cleaner being sucked into the intake manifold through the leak, temporarily altering the air/fuel mixture. Listen for changes in the engine’s idle speed or smoothness, which indicate a leak.
Through attentive application and observation, carb cleaner can reveal even the smallest leaks that visual inspection might miss. This simple yet effective diagnostic tool allows for quick and cost-effective maintenance, ensuring that engines continue to run optimally with minimal downtime.
Fixing Vacuum Leaks
Vacuum leaks in your vehicle can undermine engine performance, lead to increased fuel consumption, and cause a variety of other issues. Fortunately, detecting these stealthy culprits can be a straightforward task with the aid of carb cleaner. Once identified, addressing them promptly helps ensure optimal engine operation. Here’s what you need to know about evaluating severity, determining repair needs, and both DIY and professional solutions for fixing vacuum leaks.
Evaluating The Severity Of Leaks
Determining the seriousness of a vacuum leak is crucial. Small leaks may only cause a slight hiccup in engine performance, while significant ones can lead to major operational problems. Listen for hissing sounds and monitor the engine’s behavior for erratic idling or stalling, which can indicate the severity of the issue.
Impact On Engine Operation
Vacuum leaks directly affect engine performance by disrupting the air-fuel mixture. This disruption can cause a lean condition, triggering erratic idle, increased emissions, and potential engine damage. Understanding this impact is essential for prioritizing timely repairs.
Determining The Need For Repair
Assess your situation to decide if a repair is necessary. Minor fluctuations in idling speed or temporary irregular engine sounds might not urgent repairs. However, consistent performance issues or a check engine light often signal a pressing need for intervention.
Repair Methods
Several approaches exist for fixing vacuum leaks, from patching up simple hose cracks to replacing damaged components. Identifying the precise location of the leak is key to determining the best repair method.
Diy Fixes For Minor Leaks
For smaller leaks, a range of DIY solutions can be effective. These may include:
- Applying sealant to minor cracks in hoses or fittings.
- Tightening loose connections to eliminate air entry points.
- Replacing worn-out hoses or gaskets with new ones.
Using a carb cleaner can help you detect the exact location of the leak, so you can apply a targeted fix.
Professional Repair Options
When a vacuum leak is severe or difficult to locate, seeking professional help is advisable. Mechanics have specialized equipment and expertise to diagnose and repair complex leaks efficiently, ensuring your vehicle returns to optimal functioning.
| Leak Severity | Symptoms | DIY Repair | Professional Repair |
|---|---|---|---|
| Minor | Temporary irregular idling | Sealant application, Tightening connections | Optional but not urgent |
| Moderate | Consistent performance issues | Replacement of parts, Advanced DIY solutions | Recommended for complex issues |
| Major | Erratic idle, Stalling, Check engine light on | Insufficient without proper tools | Strongly recommended |
In conclusion, diagnosing and fixing vacuum leaks is a process that ranges from simple DIY tasks to more complex repairs that may require a mechanic’s expertise. By understanding the signs and impacts of vacuum leaks, vehicle owners can make informed decisions about the health and maintenance of their engines.
Preventing Future Vacuum Leaks
Vacuum leaks in a vehicle can lead to performance issues, increased emissions, and a decline in fuel efficiency. Discovering a leak is just the first step; diligent practices are key to deterring future leaks. Let’s delve into strategies to prevent vacuum leaks and keep your engine running smoothly.
Maintenance Practices
Regular maintenance is crucial to prevent vacuum leaks. Perform routine checks of vacuum hoses and replace them as recommended by the vehicle manufacturer. Regularly replacing air filters helps keep debris from damaging the vacuum system.
Regular Inspection And Servicing
Make inspections a part of your regular servicing schedule. A professional mechanic can often detect the early signs of wear before they lead to a leak. Investing in periodic inspections helps you avoid costly repairs down the line.
Using Quality Parts And Components
Always opt for high-quality parts when making repairs or replacements. Cheap components might save money initially but can fail prematurely, leading to more frequent leaks and mechanical issues.
Best Practices For Long-term Prevention
Understand and adhere to the best practices for your specific vehicle’s maintenance. Simple habits like avoiding harsh chemicals that can degrade rubber components play a significant role in long-term prevention.
Preserving Seal Integrity
- Inspect seals and gaskets regularly.
- Replace brittle or cracked seals promptly.
- Maintain proper torque specifications on all fittings.
Preserving the integrity of seals and gaskets is crucial to preventing vacuum leaks.
Ensuring Proper Installation And Assembly
Proper installation is paramount. Whenever a component connected to the vacuum system is serviced, double-check that everything is reassembled correctly and that all connections are secure. Proper assembly prevents leaks by ensuring a tight seal on all vacuum lines and connections.
Frequently Asked Questions For How To Check For Vacuum Leaks With Carb Cleaner
What Is A Vacuum Leak In A Car?
A vacuum leak in a car refers to unintended air entering the engine through cracks or gaps in the vacuum hoses or gaskets, disrupting the air-fuel ratio.
How Does Carb Cleaner Detect Vacuum Leaks?
Spraying carb cleaner around vacuum lines and gaskets causes engine idle speed to change if there’s a leak, as the cleaner temporarily seals it.
What Are Symptoms Of A Vacuum Leak?
Common symptoms include a hissing noise, rough idle, engine misfires, and difficulty starting, as well as reduced fuel efficiency and performance.
Can Vacuum Leaks Cause Engine Damage?
Yes, prolonged vacuum leaks can lead to engine damage by causing lean running conditions, overheating, and increased stress on engine components.
Conclusion
Detecting vacuum leaks need not be daunting. With carb cleaner, it’s straightforward. Spray, listen for RPM changes, and pinpoint trouble spots. Regular checks keep engines healthy and efficient. Embrace this simple method and ensure your vehicle’s optimal performance. Ready to tackle other car maintenance tasks?
Visit our blog for more guides.